Tying The Ishigaki Kebari
by GW ClarkAdam asked if I would post a tutorial on my variation of the Ishigaki Kebari.
My version of the Ishigaki Kebari is tied very sparsely with a thin thread body and only two turns of genetic hackle.
For proportions, I like the head of the fly to be between 1/3 and 1/2 the length of the body. I have settled on 2/5 as that just looks right to me. My tie is very, very similar to Chris Stewart's version on the Tenkara Flies DVD. Like Chris, I also prefer to use a hackle that is one size larger than the hook I am tying on. So for this #14 hook, we'll use a #12 hackle.
One thing I do differently though, is that I apply very thin water-based head cement between each layer of thread as I tie. I hate it when flies I've tied come apart.
Here is the fly we'll be tying:
Hook: TMC900BL #14
Thread: Ultra Thread, 140 Denier, Fluorescent Green
Hackle: Whiting Farms Genetic Saddle Hackle (Whiting 100's) Cree #12
Head Cement: Loon Water-Based Thin Head Cement
---------------------------------
The Tools I Use
Below is a list of the tools I use. I am showing you what I use and try to explain why I use a particular tool. I have no pecuniary interest in any of these companies, I am just a very satisfied customer.
The Vise
Dyna-King Ultimate Indexer
I far prefer clamp-style vises to pedestal vises. I seem to constantly be steadying the latter. You can also see the offset waste bag for rotary vises from Dyna-King and a Whiting Hackle Gauge.
Pay no attention to the messy desk, the maids didn't show!

---------------------------------
The Bobbin
Ekich Automatic Bobbin
Expensive, but I can no longer tie without it. The ability to hang this off of a bobbin rest then instantly return to the hook without rewinding thread is worth the extra expense.

---------------------------------
The Bobbin Threader
The cheapest, but in my opinion, the best bobbin threaders out there. They are just generic dental floss threaders. I got mine from Walgreens. Look in the dental floss section. You will never scratch a bobbin with these and the big loop makes it much easier to thread for us old guys.

---------------------------------
The Scissor
Singlebarbed.com - Sixth Finger Scissors
These come in both stainless (these) and tungsten varieties. I may try the tungsten someday. Fly tying is so much faster when you keep the scissors in your hand.

------------------------------------------------------------------
The Hackle Pliers
C & F Rotary Hackle Pliers
Beautiful, and absolutely the best hackle pliers I've ever used. Of course with genetic hackle, you only need to use it for the last 1/2 dozen or so flies from a hackle But these protect weak starling, partridge and grouse feathers as well. By the way, I normally get a minimum of 2 dozen flies from a genetic saddle hackle feather when tying Ishigaki Kebari. A Whiting 100 pack will give me about 500 flies).

---------------------------------
The Whip Finisher
After trying every style and brand of whipping tool out there, I settled on the Marc Petitjean Whip Finisher. It has never disappointed me. The spring really helps to prevent breakage with weak threads.

---------------------------------
The Cement Reservoir
Dyna-King Cement Reservoir
I never have to take my eyes off a fly to grab a drop of cement. I can do it in literally 2-3 seconds. I have two on the bench. One with thin and one with thick Loon water-based head cement. I had really grown tired of lacquer fumes and now only use water-based products.

---------------------------------
The Tweezers
Rubis of Switzerland #138 - Two-Tip Slanted Tip Tweezers
The Tweezers
Rubis of Switzerland #138 - Two-Tip Slanted Tip Tweezers
About $35.00 but worth every damned penny. I use these often instead of scissors to remove a single, rogue fiber. A fine set of tweezers is one of the most under-rated tools in fly-tying.

------------------------------
The Eraser
Feather Brand Double-edged Razor Blades from Japan
When first learning to tie a new fly, I never use cement. I will routinely razor off the first 20-30 flies that I tie until I am satisfied with the results. Be careful, as I have never found anything as sharp as these blades on anything on the planet. I keep the loose one between two magnetic business cards.

---------------------------------
Starting Out
Mount the hook in the vise. For my Ishigaki Kebaris I use barbless dry-fly hooks. Almost always size 14. Usually Daiichi 1190's but today I was out so we used the TMC900BL.
Starting Out
Mount the hook in the vise. For my Ishigaki Kebaris I use barbless dry-fly hooks. Almost always size 14. Usually Daiichi 1190's but today I was out so we used the TMC900BL.

---------------------------------
Next Step - Tie in the Thread
I generally tie in with three wraps, then clip the tag end. Notice the thread is flattened at this point. I like to tie with flat thread, and frequently stop to spin the thread anti-clockwise. A right handed tier will add 1/2 turn of clockwise twist to the tread for every revolution around the hook.

---------------------------------
Next Step - Wind Back
Finish winding back until you are about 2/5 of the way back down the shank from the head. For a #14 hook and 140 denier thread, that will be about 9 turns. When you wind the thread on the hook, do so with touching, contiguous turns.
Next Step - Wind Back
Finish winding back until you are about 2/5 of the way back down the shank from the head. For a #14 hook and 140 denier thread, that will be about 9 turns. When you wind the thread on the hook, do so with touching, contiguous turns.

---------------------------------
First Cementing
At this point I apply a very wee dab of thin water-based head cement all along the thread wraps.

---------------------------------
Prepare the Hackle
Prepare the hackle by stripping the barbs away from the stem of the feather for a length just slightly shorter that the nine wraps of thread.

---------------------------------
Tie in the Hackle
At this point, we tie in the hackle with nine turns back to the eye of the hook. Hold the feather so that the barbs are in a vertical plane with the dull (concave) side of the feather toward you. Tie in the stem on the top of the hook shank in this manner. By tying in this fashion, when we rotate the feather around the hook, over the top and away from us, the concave side will always face towards the eye in a true Sakasa Kebari shape (or at least as much shape as you can get from genetic dry-fly saddle feathers).

---------------------------------
A Little Dab Will Do Ya
Time for another wee dab of head cement.

---------------------------------
Going In Reverse
Ok, now with flattened thread, wind back to the base of the hackle.

---------------------------------
Finally, The Other Side
Lift the hackle straight up in the air and wind three turns of thread behind the hackle. Right now I apply another drop of head cement right at the base of the feather.

---------------------------------
It's Hackle Time
I use only two turns of hackle around the shank. This makes for a VERY sparse fly. Is it any better than heavier hackled flies? Hell if I know, but this is my fly and I like the looks of it. Nuff said.
Notice how I am pulling the feather straight up with a good amount of tension. A.K. Best taught me that the best flies are tied when the materials are pulled to almost to their breaking point.

---------------------------------
Next - Tie off the Hackle
This step is rather hard to describe. What I do is while holding the feather very tight vertically, wind the thread in front of the vertical feather and then wind in and out of the barbs we are going to keep (so as not to trap any of them in the tie-in point) as I go around the shank always returning immediately in front of the tag end of the hackle. I make five, very tight turns like this to hold the hackle in place.
When done it will look something like this:

---------------------------------
Trim That Mess
Use your scissors to trim away all the barbs tied under the five thread wraps. For any errant fibers that give my scissors trouble, I just use the tweezers and pluck them out.
Using your thumb, index and middle fingers, pull the barbs forward and with your left hand, make one or two thread wraps to push the fibers into the Sakasa shape. I know you're bored of this, but I apply a tiny drop of glue over those wraps right now.

---------------------------------
Back and Forth
Now with flattened thread, wind back to just past the hook point. From this angle it looks like I may be just a titch too far back. Wind forward back to the base of the hackle. If you need one or two more turns to give a better Sakasa shape, this is the time to do it.

---------------------------------
Almost done
Apply a very thin layer of cement to the top of the existing windings and wind back to a point three turns beyond where you originally stopped the first layer of thread. Apply head cement to those three turns and give the fly a five turn whip finish winding from the butt back to the finished body. This should give you a nice taper
Apply a very thin layer of cement to the top of the existing windings and wind back to a point three turns beyond where you originally stopped the first layer of thread. Apply head cement to those three turns and give the fly a five turn whip finish winding from the butt back to the finished body. This should give you a nice taper

---------------------------------
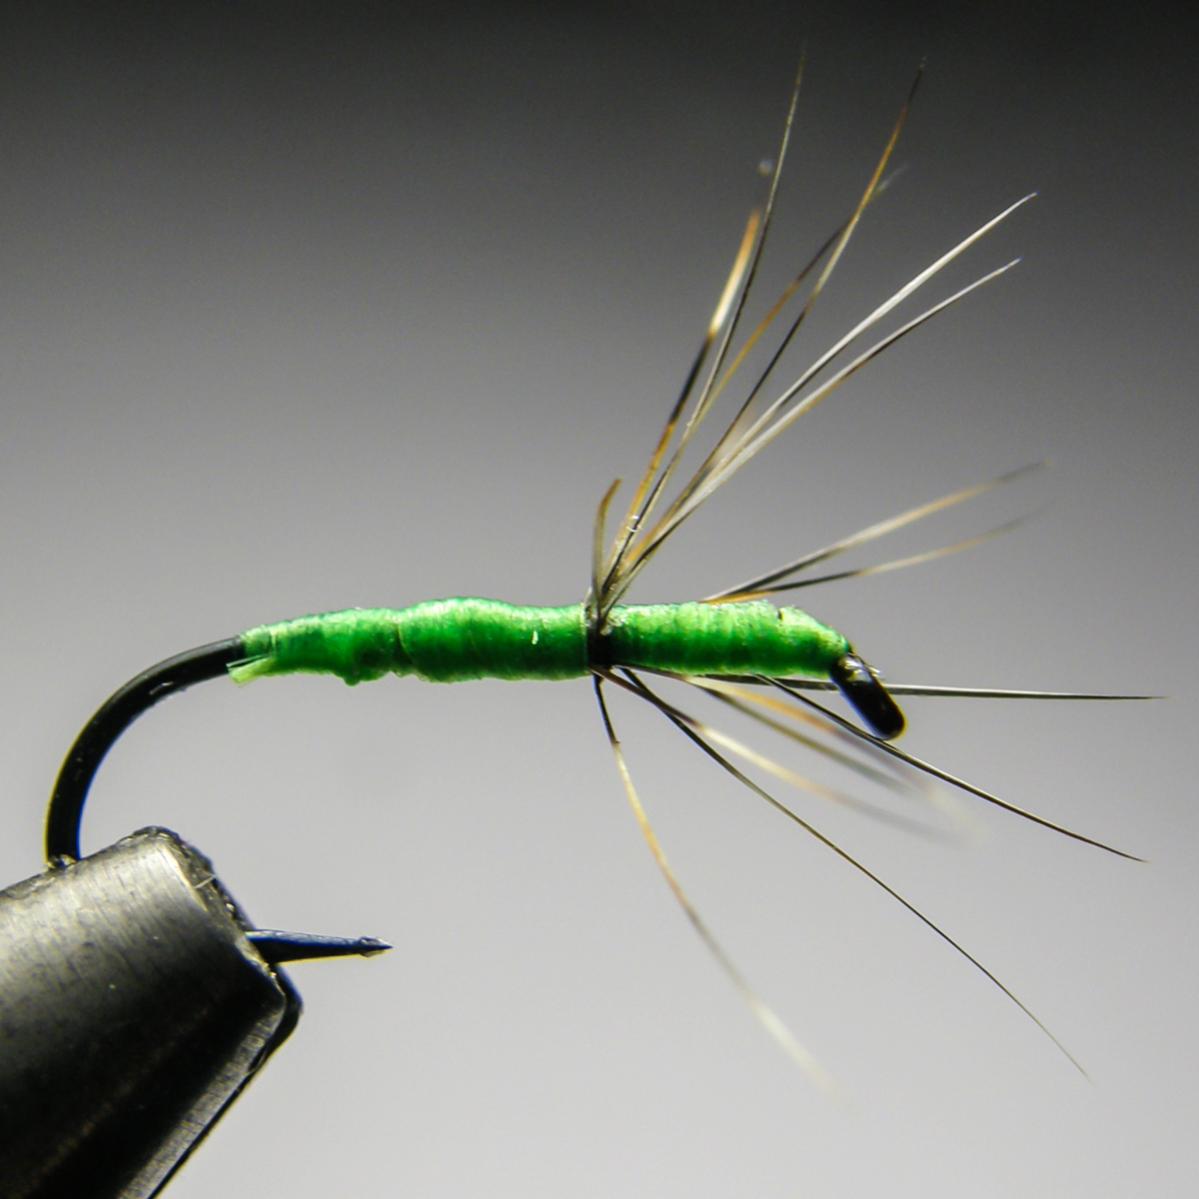
Whew! Finished...
Trim the thread, add to fly box, repeat 23 more times. As I tie for both myself and my dad, I always tie two dozen of any fly.In reality, these flies only take a couple of minutes to tie.
This has been a lot of fun, and if you have any questions, don't hesitate to ask.
GW